Saturday, December 3, 2016

Let's Make it SNOW with UDDERLY SMOOTH!


Wintertime is here even in Florida, with the drier air and less humidity, so Udderly Smooth is a necessity.  And with all the hand washing during the baking and crafting sessions, my skin gets so dry, but Udderly Smooth fixes my dry hands right up! 

SO, let's make it snow - IN FLORIDA!


Materials:
Tombow Xtreme Permanent Adhesive
Tombow Mono Multi Liquid Glue
Small, medium and Large spring style clothes pins (8 for each snowflake)
Design Master ColorTool spray paint - flat white
Chunky glitter


Instructions:
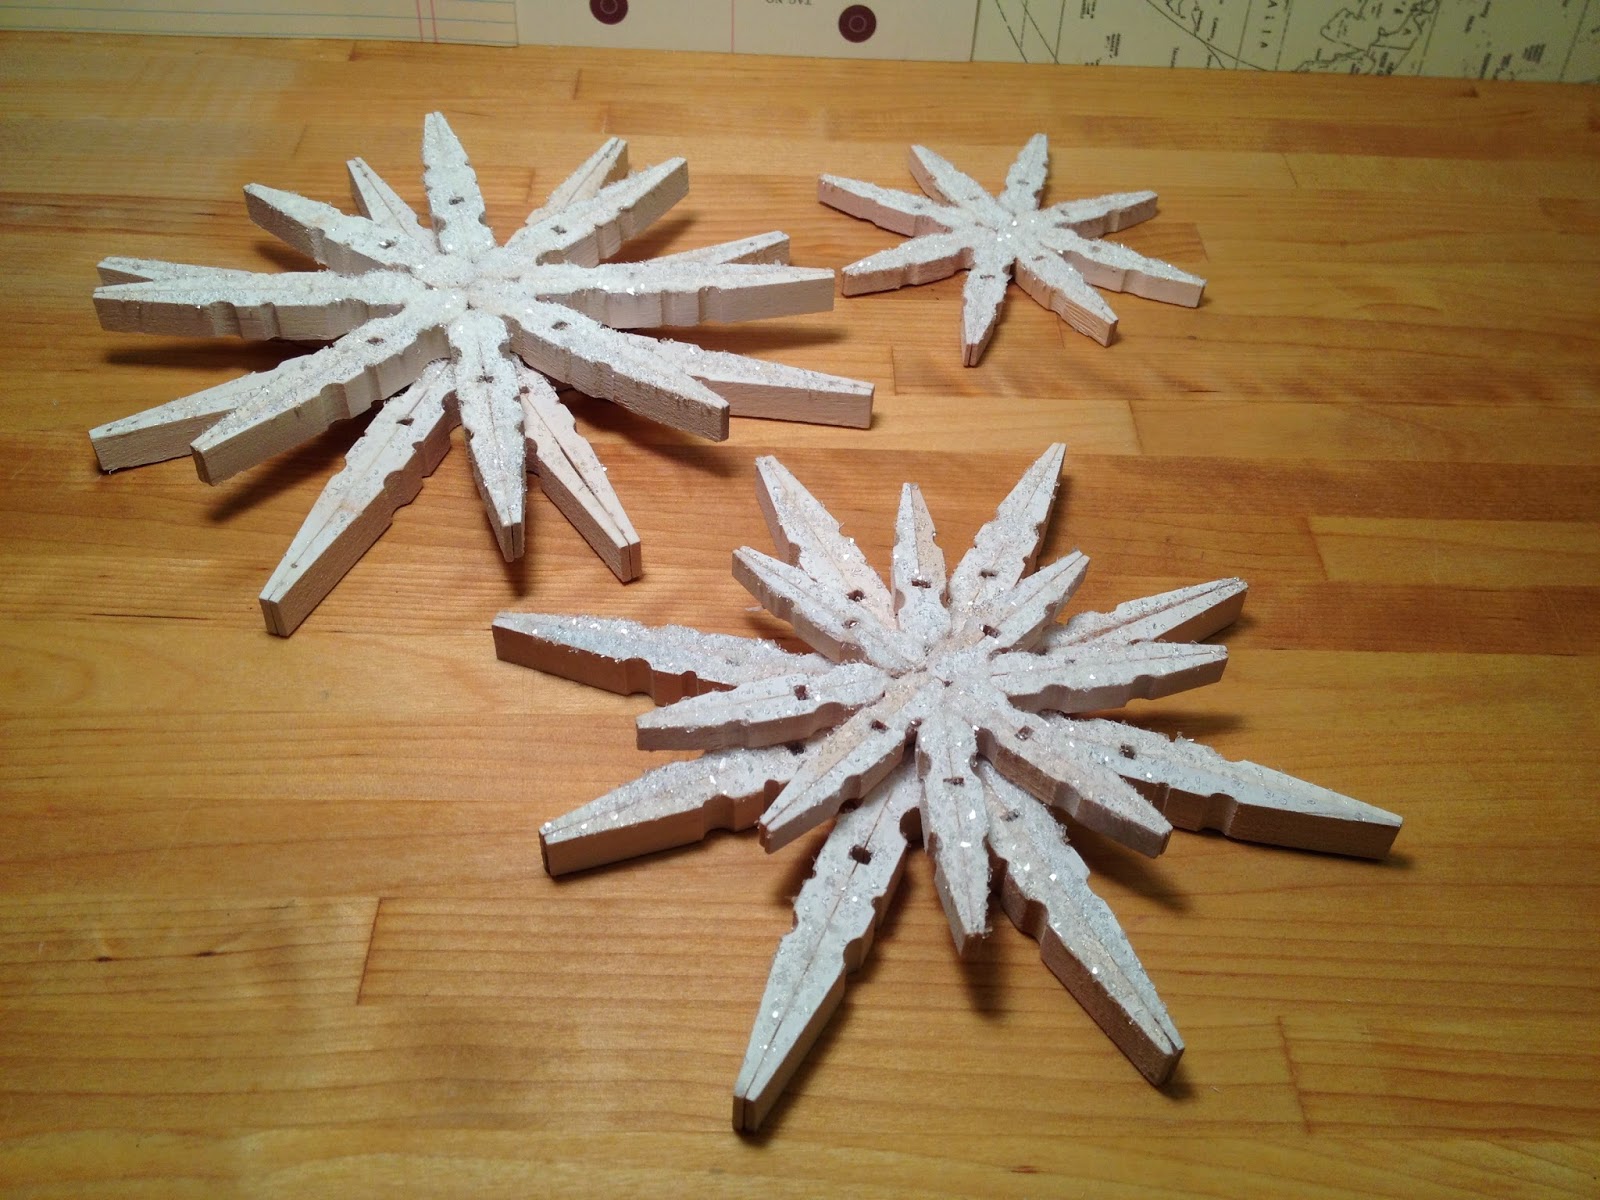
Remove the springs from the clothes pins.  You will need 8 clothes pins for each snowflake.


Attach flat sides of clothes pins together with Xtreme adhesive.  There is a specific way to apply the Xtreme:  run a line of adhesive then snap it off at a 90degree angle.


Apply Xtreme to both sides of the diagonal surfaces and attach as show in photo.  The double application makes the Xtreme even more powerful!

Spray top face of snowflakes with Design Master ColorTool Flat White spray paint, let dry.  I didn't worry about the sides as I like the rustic look.

Once dry, apply a thin layer of Mono Multi Glue with the broad tip.  Sprinkle with chunky glitter, shake off excess and let dry.

Layer the snowflakes on top of each other or leave single.  Attach a ribbon and hang on the tree or use as a package topper instead of a bow.

These are so quick and easy to put together that you could create a blizzard in an afternoon and paired with Udderly Smooth, it's a snow storm that won't dry out your skin!

Thanks for stopping by! -Beth


Sunday, October 16, 2016

Halloween Popcorn Box Blog Party 2016: Jack-O-Lantern Hot Air Balloon


For the past couple years Laura, of Laura Kelly Designs and Me and My Inklings, has hosted a Halloween Popcorn Box Party and this year, I'm happy to announce, I got to participate! The gist of the hop is that 50+ bloggers are given a popcorn box and asked to create something...anything, as long as it is uses the box and has a HALLOWEEN theme. Scroll down to discover how I turned this humble Popcorn Box into a Jack-O-Lantern Hot Air Balloon!


Now, on to my project!

Base coat an 8" paper mache pumpkin with Americana acrylics by DecoArt Georgia Clay and stem Dark Chocolate, let dry.  Using random strokes, top coat pumpkin with a combination of Jack-O-Lantern Orange and Tangelo, then stem with Burnt Umber, let dry. Base coat the top, bottom and folded edges of the Popcorn Box with Fawn, let dry.


Using the Basket stamp from ColorBox Background Basics by Ann Butler and Bark  ColorBox Crafter's Ink by Ann Butler to cover two pieces of Kraft cardstock.  


To create a template for the Popcorn Box, lay the box flat and trace around the edges, connect the last edge with a ruler and then cut out.  Trace three more times and cut out, so you have four pieces.  


Attach cut outs to each side of Popcorn Box with Tombow Extreme Permanent Adhesive.  Distress edges with Bark ink pad.


Cut our four "sacks" from Kunin Eco-fi® Classicfelt™ in Walnut and tie on pieces of twine.  Attach 3" lengths of twine to the back and adhere to Popcorn Box with Tombow MONO Multi XL Liquid Glue.


Draw Jack-O-Lantern face on pumpkin, fill in with DecoArt Graphite and accent with Antique Gold.


Attach a piece of scrap styrofoam to bottom of Jack-O-Lantern and inside Popcorn Box.  Paint 10" length of dowel with DecoArt Fawn, let dry.  Insert one end of dowel in base styrofoam and the other in pumpkin styrofoam, secure with MONO Multi XL


Cut five 14" lengths of sparkly black eyelash yarn and attach each length by stem lining up with each divide in pumpkin using MONO Multi XL, let dry.  Gently pull each length of yarn taught and attach to inside of Popcorn Box.


Fill with your favorite Popcorn (mine is cheesy popcorn) and ENJOY!


And now for my second project - SUPER quick and easy so even the kiddos can help!

Base coat the Popcorn Box with two coats of DecoArt Purple Rain, let dry between coats.


Using Tombow MONO Multi XL Liquid Glue to attach a variety of wiggle eyes to each side of the Popcorn Box.


Tie a funky ribbon around the center and finish with a bow to complete this project in under 30 minutes!


Now for the YOUR part! 


This year the popcorn boxes were provided by World Market and they have also sponsored a CONTEST! WOO HOO!! Everyone loves a contest and ANY of the FIVE PRIZES below would be awesome to win so, be sure to scroll down to the bottom of this post and get entered, via Rafflecopter. 

  • $50 World Market Gift Card
  • Sizzix Big Shot Machine (or Ellison Superstar) and Laura Kelly Dies - Value $100
  • Adorn It Planner Kit (Planner, Laura Kelly Papers and Stickers) - Value $65
  • Udderly Smooth Prize Pack with Hat and Mug - Value $75
  • DIY with Laura Kelly Crafty Stash (Kunin Felt, Expressionery Stamp, Expo International Pom Pom Trims and Tombow Products) - Value $100

ENTER TO WIN BELOW then scroll down and see what all the other participants made with their popcorn boxes! 

Linky Code:
Rafflecopter Code: a Rafflecopter giveaway

THANKS FOR STOPPING BY!  -Beth

Wednesday, September 7, 2016

Craft Lightning Halloween Kids Foot & Hand Print Art

Happy Wednesday and Welcome to Craft Lightning Halloween edition! All the designers participating this week will be sharing Halloween crafts created in 15 minutes, so let the fun begin!

All week long our hosts, Angie from The Country Chic Cottage, Carolina from 30 Minute Crafts and Jen from 100 Directions along with me and some other crafty friends will be sharing scouting related crafts! 

Click the Craft Lightning link at the very bottom of my post to see all the fun and inspirational Halloween crafts that have been created this week!

Now on to my project!

Use your child's foot and hand prints to create a cute, quick and easy Halloween craft to decorate your door this Fall!


STEP ONE:

Start out with three canvas boards 8" by 10".  Using Americana Acrylics by DecoArt, paint one Lamp Black, one Tangelo Orange and one Purple Rain, let dry.  


Place two child's footprints with Hauser Light Green on black canvas and two with Titanium White on orange canvas.  Place two child's hand prints (no thumbs) with Lamp Black on purple canvas. I put a quarter sized puddle on a paper plate and used a foam brush to apply the paint, then press down and lift straight up.  Clean up is easy with baby wipes.


STEP TWO:

I used glow-in-the-dark wiggle eyes, chipboard shapes and letter stickers from my stash along with my favorite adhesive Tombow MONO Multi Liquid Glue.


STEP THREE:

Add accents with permanent markers...


Metallic markers...


And ribbons.


Now it's time to HOP around and be inspired by all of the Craft Lightning Halloween Crafts!  Just click the link below!
Do you have a favorite Quick Halloween Craft? I’d love to hear about it, leave me a comment below or tag me on Instagram at @Beth3167 and tell me all about it!

Thanks for stopping by -Beth

Thursday, August 25, 2016

Rebekah Meier Designs Fabric Elements Blog Hop!

Happy Thursday and welcome to the Designer Crafts Connection Blog Hop with Rebekah Meier Designs Fabric Elements!


Rebekah is one of my dear crafty friends and a fabulous fabric artist, so I was excited when she came out with her Fabric Elements line.  It makes fabric art easy for a mixed media artist to be successful at AND won the best new product award at the 2015 Craft & Hobby Show.

For those not familiar with Fabric Elements, here is a little background in Rebekah's own words:  "Award winning Fabric Elements™ is a culmination of my experiments, favorite materials, and techniques.  It is a collection of my stencils, tissue paper, and fabric designs with pre-packaged fiber goods – such as batting, felt, gauze, Lutradur, and many others.  The collection is designed to work together with my techniques and instructions to create endless mixed media and fiber art projects.  I love to take the ordinary – like quilt batting and interfacing – and combine them with paint, inks, and other embellishments to elevate them into something extraordinary!"

Each designer received a Fabric Elements kit and then I broke out my Rebekah Meier Designs stencils from the Crafter's Workshop, some DecoArt Media Fluid Acrylics - let the crafting begin!


The instructions were simple to follow (I always read through directions first, so I can avoid craft fails), then I just started layering paint and stencils and more paint.  I used Cobalt Turquoise Hue, Prussian Blue Hue, Green Gold, Ultramarine Blue and Quinacridone Magenta.  The fluid acrylics are partially transparent, so they are perfect for layering.


The last step was adding the Titan Buff accents to the top layer, which really makes the entire piece POP!


I ripped a few strips with the Green Gold background, tinted the lace trim with the Magenta before adding these elements to my Quilt.  I layered the fabric, then the batting then my mixed media piece on top, instead of having a border around the edge.


I stenciled the smaller piece of batting included in the kit with Prussian Blue and then accented with Turquoise and Green Gold. I then stitched around the edges of the Mini Paper Quilt in black and through the center of the medallion, which gives it dimension.


I accented the stenciled words FLY AWAY with Tombow MONO Twin Permanent Marker, which I think really makes them jump off the page.


The mixed media nature of this project allowed me to be loose with my stitching and not worry about perfectly straight lines! Imperfection is perfect!  The final accents were off white pearls and purple rhinestones.  I enjoyed letting go and just creating this Mini Paper Quilt!


NOW FOR THE FUN STUFF!  Make sure you visit the Designer Crafts Connection blog to HOP through to all the designers projects AND enter for your chance to win the FANTASTIC PRIZE below from Rebekah Meier Designs.  WOW!


Thanks for stopping by!  -Beth

Friday, July 29, 2016

ETI and GEL PRESS Blog Hop!

Happy Friday and Welcome to the 
ETI and Gel Press Blog Hop
The designers for both companies have been busy creating wonderful projects for this blog hop. You should have hopped here from the wildly talented Cindi at Behind these Eyes, but if you just stopped by my blog today, please start the hop at the ETI Resin Crafts Blog!

Now, on to my project!

Gel Press sent a 5" by 7" gel printing plate, so I watched a few of the videos on their site and I couldn't wait to get started!

Below are some of the mono prints that I made in just a few hours with DecoArt Media Paints, Ann Butler's Iridescents by Earth Safe Finishes, plus her Art Screens and Background Basics Stamps by Clearsnap.  Now I am HOOKED!


Here is a close up of the two mono prints that I decided to use for my project featuring DecoArt Media Fluid Acrylics Green Gold, Titan Buff and Colbalt Turquoise Hue - can you see the shimmer of the Iridescents Paint? GORGEOUS!


I found the oval and square recessed wooden shapes at the local craft store and hoarded saved them for a resin project!  Paint the edges with Iridescents Copper.  Place plain computer paper in the center of each shape and then score around the edge with a bone folder to create a template.  Cut out the template and trace on to your mono print.  Trim mono print and attach to wooden shape with gel medium, making sure to apply a thick, solid coat.

Attach chipboard letters and embellishments with Tombow MONO Aqua Liquid Glue.  Once dry, apply a layer of gel medium to seal these items to the background.

Next comes measuring and mixing the resin.  I found this intimidating the first time I did it, but it really is quite simple! 

When using EnviroTex Lite always measure equal parts of resin and hardener. Blend in an ETI plastic cup with a wood stick (only a wooden stick) for two minutes, mixing vigorously while scraping sides and bottom of cup. Then pour resin into a new, clean cup and blend for another minute with new wooden stick. Thorough blending is achieved by the above mixing method only! Discard mixing stick. Pour resin onto project immediately. Use stick lighter to remove bubbles from coating. You may need to use the lighter several times during a forty five minute period following application. 

Important: read all instructions included with EnviroTex Lite.

Always pour resin on a level surface that has been protected with waxed or freezer paper. 

Immediately pour your resin onto your project.  Remembering that the resin will self level.

Remove any bubbles with the flame of a stick lighter.  Repeat as needed over the first 45 minutes of the resin hardening process.

Your resin should be as clear as glass.  Here is a detailed photo...

After your resin has cured for 24 hours, cut a 48" length of cotton ribbon and attach wooden shapes with Tombow Xtreme Tabs.

Here are close up photos of each panel - HOME, SWEET, HOME


And, a close up of the Iridescent Copper Paint through the resin - WOW!

Please leave a comment on EACH blog, then tell us on the Gel Press blog and on the Resin Crafts blog which projects you found most interesting or inspiring. 
Now, on to the fun stuff - PRIZES!

One winner will be picked, at random, Sunday, July 31, 2016, at 10pm CST. The winner will get both Petite sets of Gel Press plates and ETI Jewelry Resin! Winner must be 18 or over and live in the USA.

Hop now through Sunday and GOOD LUCK!

Be sure to check out the social media accounts for ETI Resin Crafts and Gel Press for TONS more inspiration!


Thanks for stopping by!  -Beth